Setting up bash on Ubuntu on Windows 10 with RVM, Node.js, Gulp, and Dotfiles!
Prerequisites: Native Windows 10 PC (I am using Windows 10 Home with the Fall Creators Update)
Contents:
- Assumptions
- Helpful Automations
- Enable Scrolling in Git CMD
- Install Bash on Ubuntu on Windows 10
- Update Ubuntu
- Cleanup Prior Rubies
- Install RVM
- Install Latest Ruby Version and Update
- Install Jekyll
- Install a Specific Version of Node.js
- Install Bundler
- Install Gulp
- Dotfiles on Bash on Ubuntu on Windows 10
Assumptions
- Command prompts (cmd.exe, git-cmd.exe) should always be run as Administrator.
- I use Git CMD (git-cmd.exe) for my Windows command line:
- Git command (git-cmd.exe) is downloaded and installed with the standard git-scm installer at: https://git-scm.com/.
- I DO recommend going to https://git-scm.com/, downloading, and doing a standard install (leaving all settings default).
- Git Command IS different than Git Bash
- Square brackets are used to designate a key on the keyboard such as the escape key: [Esc]
- Commands starting with "$" designate commands that should be run in a bash shell instance.
- Each command will be on its own line and preceded by a "$".
- Comment lines start with // and use white text whereas code is green text.
- Lines of code should be run one at a time.
// type bash and hit [enter] to start a bash shell instance
bash
// <values> are meant to be replaced with a real value
$ gem update <gemname>
Helpful Automations
There are certain things you can do to make you command prompt experience more enjoyable. These automation steps are optional, but make life easier
- Set Git Command to run with Administrator privileges every time:
- Pin git-cmd.exe to taskbar:
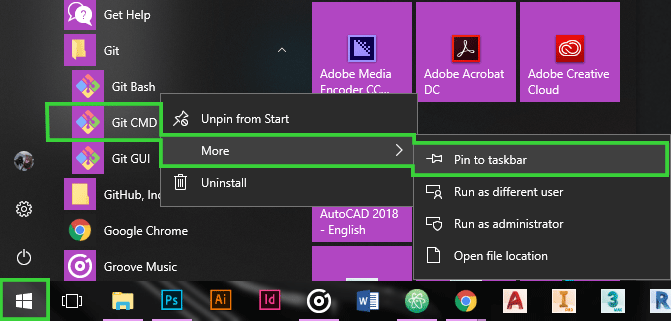
- Click the Windows start and search all programs for "Git CMD" within the git programs folder
- Right click "Git CMD" and choose More > "Pin to taskbar"
- Adjust the new taskbar shortcut's properties:
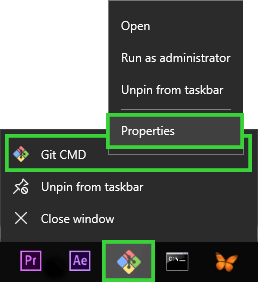
- Right click the new Git CMD taskbar icon.
- Right click "Git CMD" in the menu that popped up and choose "Properties".
- Choose the "Advanced..." button from the "Shortcut" tab that you should already be on.
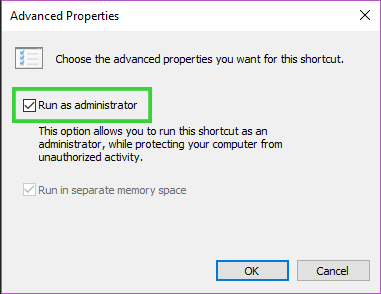
- Check the "Run as Administrator" checkbox in the Advanced Properties dialog box that popped up.
- Click "OK" to accept the change in the Advanced Properties dialog box
- Click "Apply" then "OK" if you want to skip the next automation step. What will happen from this change is:
- Clicking the Git CMD icon in your taskbar will now ask you for Administrative priveleges so that you don't have to specify it every time.
- Note: this only affects launching Git CMD from that specific taskbar icon
- Running Git CMD from the Windows Start menu will still require right clicking to specify "Run as Administrator"
- Set Git CMD to run the "bash" command for you when it opens:
- If not in the Git CMD taskbar icon's properties, go there:
- Right click the new Git CMD taskbar icon.
- Right click "Git CMD" in the menu that popped up and choose "Properties".
- Add "bash" to the end of the "Target:" field.
- Your Target should read "C:\Program Files\Git\git-cmd.exe" --cd-to-home or something along those lines by default.
- You want it to read: "C:\Program Files\Git\git-cmd.exe" --cd-to-home bash
- Click "Apply" then "OK" to accept the changes.
- Now, when you click the Git CMD taskbar icon it will run as Administrator and enter the bash command for you so you can get straight to your work.


Enable Scrolling in Git CMD
For me, Git CMD would not scroll by default and the Git Bash scroll fix did not work for Git CMD. This is an issue when a command prints more lines of text than fit in the window. For example, I would run $ rvm -h and would be unable to see everything it returns such as warnings and errors that are printed first. I found the solution in Git CMD's Properties.
- To access the Properties dialog box, right-click on Git CMD's (blank) menu bar on the top.
- From this right-click menu Choose Properties (at the bottom).
- Go to the "Layout" tab.
- Set the Screen Buffer Size Height: to a large value such as '1050'
Install Bash on Ubuntu on Windows 10
You need to be able to use $ bash from a cmd prompt.
To do this, use the following steps:
- Enable the Linux Subsystem for Windows
- Open PowerShell as Administrator
- Run the following command to enable the Linux Subsystem:
Enable-WindowsOptionalFeature -Online -FeatureName Microsoft-Windows-Subsystem-Linux
- Follow any prompts and restart when prompted.
- Download and install Ubuntu:
- Make sure new programs are set to install on your C:/ drive
- Settings > System > Storage
under "Manage storage settings", set "New apps will save to:" to "This PC (C:)" - Go to the Microsoft Store app and search for, and install, Ubuntu.
- Run Ubuntu initial setup:
- Click the new Ubuntu start-menu item to launch Ubuntu for the first time.
- Follow the prompts for the first installation.
- Create, and REMEMBER, a new UNIX username and Password
- You will use this password a lot, so choose wisely. It's used for things like running commands as root user with sudo.
- Turn Windows Developer Mode on:
- Go to Settings > Update & Security > For developers and select the "Developer mode" radio circle.
- Apply the default "File Explorer" and "PowerShell" settings.


You should now be able to type the $ bash command into any command prompt (e.g. cmd.exe, git cmd) to create a bash shell instance in Windows.
Update Ubuntu
- To update Ubuntu on Windows 10 run:
// start a bash instance
bash
// update and upgrade Ubuntu using apt-get
$ sudo apt-get update -y && sudo apt-get upgrade -y
**KEEP OUT OF ROOM 237**
NEVER ATTEMPT TO MODIFY OR ACCESS ANY PART OF THE LINUX SUSYSTEM using windows or any program (e.g. Windows Explorer, Atom).
Windows programs will corrupt the Linux system's code by inserting its garbage, and BAD THINGS WILL HAPPEN!
You should ONLY MODIFY LINUX SUBSYSTEM USING A BASH SHELL INSTANCE if you know what you are doing.
Cleanup Prior Rubies if Needed
Prior to the next steps, I had installed Jekyll via the method on jekyllrb.com Docs Installing on Windows page. This ruby version and the installed ruby gems must be removed FIRST.
- To remove Ruby installed via jekyllrb.com/docs/windows/
// remove the ruby version installed via jekyllrb.com
$ sudo apt-get remove ruby2.3 ruby2.3-dev build-essential dh-autoreconf
// and a little bit of cleanup
$ sudo apt autoremove
- I also had conflicting RVM installed on top of that. You shouldn't need this step unless you've tried to install RVM already. If you need to start fresh run:
// cleanup rvm source files
$ rvm cleanup all
// remove rvm installation
$ rvm implode
Install RVM
- Request RVM keys from public key server:
$ gpg ‑‑keyserver hkp://keys.gnupg.net ‑‑recv‑keys 409B6B1796C275462A1703113804BB82D39DC0E3 7D2BAF1CF37B13E2069D6956105BD0E739499BDB
- Install gnupg2:
$ sudo apt-get install gnupg2
- Download and run RVM installation shell script:
// download the installation script
// I left the instllation scripts as-is
$ \curl -sSL https://get.rvm.io -o rvm.sh
// edit installation shell script with this
$ less rvm.sh
// run the RVM installation shell script
$ cat rvm.sh | bash -s stable
// set the RVM source path OR exit and restart cmd and start new bash instance
$ source ~/.rvm/scripts/rvm
Install Latest Ruby Version and Update
- Install the latest stable version
$ rvm install ruby --default
- Check ruby installation:
$ ruby -v
// my ruby version returns 2.4.1
ruby 2.4.1p111 (2017-03-22 revision 58053) [x86_64-linux]- Update gems with:
$ gem update
- I had to install a libgemplugin-ruby dependency with:
$ sudo apt-get install libgemplugin-ruby
Install Jekyll
- Install the jekyll gem with:
$ gem install jekyll bundler
// check the installation
$ jekyll -v
Install a Specific Version of Node.js
Using the Windows Node.js installer will put node.js and npm in the windows system. We want to use node.js and npm while in the bash linux subsystem.
- Prepare for installation:
// enter sudo su mode
$ sudo su
// always good to update before installing
$ apt-get -y update
// install git in the linux subsystem
$ apt-get install git- Use curl to download Node.js. Replace the only number in the command below, with the desired version number. Refer to https://nodejs.org/en/:
// this will download the "Recommended" (stable) version 8.9.4 LTS
$ curl -sL https://deb.nodesource.com/setup_8.x | sudo -E bash -
// install the downloaded version of nodejs:
apt-get install -y nodejs
// OR - for the 9.6.1 "Current" version use:
$ curl -sL https://deb.nodesource.com/setup_9.x | sudo -E bash - apt-get install -y nodejs
// nodejs 9.x needs this as well:
apt-get install -y nodejs- Exit su with [Ctrl] + D
Install Bundler
$ gem install bundler
Install Gulp
- Install Gulp.js globaly using the following command:
// npm installs only ever work with sudo for me:
$ sudo npm install --global gulp-cli
Dotfiles on Bash on Ubuntu on Windows 10

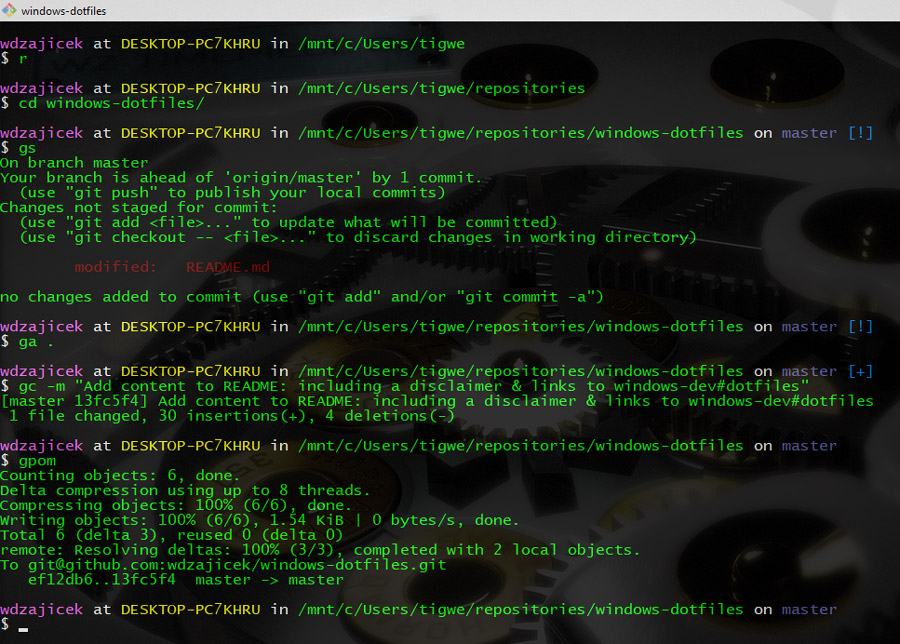
Why bother with dotfiles on Windows? Dotfiles are awesome and easy to install, thats why! Above is a screenshot of my dotfiles in action. Customization of text colors is nice, but I love aliases. Instead of typing out comands like "git status" a million times, I just type "gs" for the same command. These dotfiles are based off of github user paulirish's.
Some of my commonly used aliases include:
- g = git
- gs = git status
- ga = git add
- gc = git commit
- gb = git branch
- go = git checkout
- gu = gulp
- gpom = git push origin master
- gpum = git pull origin master
- Change to Home Directory:
$ cd ~
- Download my dotfiles
// clone the git repo
$ git clone https://github.com/wdzajicek/dotfiles.git
// cd to downloaded repo
$ cd dotfiles- Open /dotfiles/.bash_prompt in vim.
// view the file using vim:
$ vim .bash_profile
// do NOT enter insert mode to copy text- Copy the following code in vim by highlighting and right clicking:
// ignore the first lines of code:
[[ -s "$HOME/.profile" ]] && source "$HOME/.profile" # Load the default .profile
export PATH="/usr/local/opt/gettext/bin:$PATH"
// this is the code we want:
for file in ~/.{path,bash_prompt,aliases,functions}; do
[ -r "$file" ] && [ -f "$file" ] && source "$file";
done;
unset file;
// ignore the code after- Every time you call "bash" in a command line the bash shell reads a file in your Home directory named ".bash_profile"
- This code we copied is telling the bash shell to look in the home directory for .bash_prompt, .aliases, and .functions
- Exit vim
- To exit vim type ":q" and press enter
- If in insert mode first press [Esc] to be able to type ":q"
- If you need to force quit because you made accidental edits use ":q!"
- Paste code into current .bash_profile
// back out one dir level (back to Home)
$ cd ..
// open your actual .bash_profile in vim
$ vim .bash_profile- Enter instert mode with [I] key on keyboard
- Paste code before path to RVM
- This is an EXAMPLE of what your .bash_profile may look like:
[[ -s "$HOME/.profile" ]] && source "$HOME/.profile" # Load the default .profile
export PATH="/usr/local/opt/gettext/bin:$PATH"
for file in ~/.{path,bash_prompt,aliases,functions}; do
[ -r "$file" ] && [ -f "$file" ] && source "$file";
done;
unset file;
[[ -s "$HOME/.rvm/scripts/rvm" ]] && source "$HOME/.rvm/scripts/rvm" # Load RVM into a shell session *as a function*- Save edited .bash_profile and exit vim:
- Press [Esc] to exit insert mode
- Type ":w" and press enter to write (save) the file
- Type ":q" and press enter to exit vim
- OR just combine both with ":wq"
- Copy .aliases, .functions, and .bash_promt to your Home dir. We told the bash shell to look for these dotfiles in the Home dir but they aren't there yet.
// you may already be home:
$ cd ~
// go back into downloaded dotfiles repo
$ cd dotfiles
// use the cp command to copy the files and place them up one dir level (in your Home dir)
$ cp .aliases ../.aliases
$ cp .functions ../.functions
$ cp .bash_prompt ../.bash_prompt
- Close all bash instances and restart a command prompt and run bash again